Carpal Tunnel Yoga: 8 Poses & Stretches For Pain Relief

From Dr. Z - Carpal tunnel syndrome specialist

woman with hand pain practicing yoga

Carpal tunnel yoga may help reduce numbness, tingling, pain, and stiffness by improving tendon flexibility, circulation, posture, and upper body alignment around the wrist and median nerve.

Carpal tunnel yoga combines stretching, strengthening, posture correction, and circulation-enhancing movements to help relieve pressure on the median nerve inside the wrist.


When yoga exercises are performed consistently and correctly, many people experience improvement in:

  • numbness,
  • tingling,
  • burning,
  • weakness,
  • hand stiffness,
  • and nighttime symptoms


One major advantage of yoga is that it treats more than just the wrist. Carpal tunnel syndrome is often influenced by poor posture, tight shoulders, muscle imbalance, tendon restriction, and repetitive strain throughout the upper body.


Unlike treatments that focus only on the wrist, yoga attempts to improve movement and alignment throughout the entire upper body.

Can yoga help carpal tunnel syndrome?

Yes, carpal tunnel yoga may help reduce pressure on the median nerve by improving tendon flexibility, circulation, posture, and upper body alignment. Helpful poses and stretches include Cat & Cow, Prayer Position, Upward Facing Dog, thumb stretches, and wrist tendon stretches performed consistently over several weeks.
✋ Could Carpal Tunnel Syndrome Be Causing Your Symptoms?
Frequent numbness, tingling, burning, weakness, or nighttime hand pain may signal carpal tunnel syndrome. These free tools may help you better understand how advanced your symptoms actually are.

People Also Ask

Can yoga help carpal tunnel syndrome?
Yoga may help reduce tendon restriction, improve circulation, improve posture, and decrease pressure on the median nerve inside the wrist.
What yoga poses are best for carpal tunnel?
Helpful poses often include Cat & Cow, Prayer Position, wrist stretches, thumb stretches, Upward Facing Dog, and tendon gliding stretches.
Can yoga make carpal tunnel worse?
Aggressive wrist loading or improper positioning may worsen symptoms. Exercises should be gentle and avoid excessive pressure on the wrist joint.
How often should I do yoga for carpal tunnel?
Most experts recommend practicing yoga exercises at least once daily. Many patients improve faster when exercises are performed 2-3 times per day.

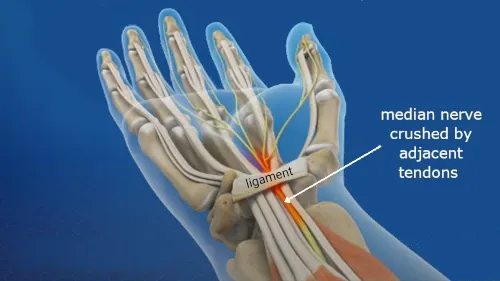
Signs Of Carpal Tunnel Syndrome

Carpal tunnel syndrome is a neurological disorder affecting millions of Americans. It develops when swollen flexor tendons compress the median nerve inside the wrist.


Common symptoms include:


Symptoms usually affect:

  • the thumb,
  • index finger,
  • middle finger,
  • and part of the ring finger,

but not the pinky finger.


Many people first notice symptoms during sleep before symptoms eventually appear during daytime activities as the condition worsens.

median nerve in the carpal tunnel

How Carpal Tunnel Yoga Helps

Carpal tunnel yoga focuses on improving flexibility, circulation, posture, tendon gliding, and upper body alignment.


The National Institutes of Health says that research comparing yoga to conservative treatments has shown meaningful improvement in both symptoms and hand function in many patients.


The goal of yoga is not simply stretching the wrist. Instead, yoga attempts to improve balance and alignment throughout the:

  • neck,
  • shoulders,
  • upper back,
  • forearms,
  • wrists,
  • and hands.


Helpful effects of yoga may include:

  • improving tendon flexibility,
  • improving blood flow,
  • reducing tendon restriction,
  • improving posture,
  • reducing upper body tension,
  • and decreasing pressure on the median nerve.


For best results, movements should remain gentle and controlled without excessively stressing the wrist joint.

Important:

Yoga exercises should feel like gentle stretching — not sharp pain. Aggressive wrist loading or forcing movements may worsen symptoms, especially in severe carpal tunnel syndrome.

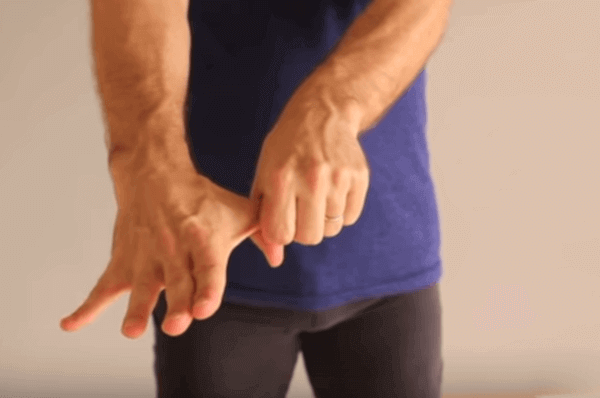
Yoga Poses & Stretches

If your symptoms are severe, begin with gentler movements that place less weight on the wrists. As strength and flexibility improve, you may gradually progress to more advanced poses.


All exercises should ideally be performed:

  • on a yoga mat,
  • in a quiet environment,
  • and with slow controlled breathing.


Begin slowly and stop any movement that sharply increases numbness, pain, or burning.
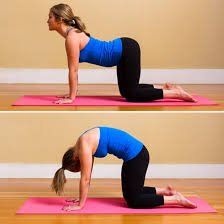
1. Cat & Cow

yoga cat and cow positions

Cat & Cow helps improve posture, spinal alignment, upper body flexibility, and circulation throughout the shoulders, arms, and wrists.


Poor upper body posture commonly contributes to excessive stress on the wrists and median nerve.


STEP 1

Start on all fours with:

  • wrists directly beneath shoulders,
  • and knees directly beneath hips.

STEP 2

Close your eyes and breathe normally. Imagine your spine extending smoothly from your tailbone through the top of your head.


STEP 3

During inhale:

  • curl your toes,
  • drop your belly,
  • and gaze upward.

During exhale:

  • round your spine,
  • drop your head,
  • and gaze toward your navel.

Repeat slowly with each inhale and exhale while matching movement to breathing.

2. Lotus Pose

woman in yoga  lotus pose

Lotus Pose may help improve circulation, posture, upper body relaxation, and muscle balance throughout the arms and hands.


STEP 1

Sit on the floor with:

  • legs extended,
  • spine straight,
  • and arms resting comfortably at your sides.

STEP 2

Bend your right knee and bring it toward your groin.


STEP 3

Bring your left foot onto the top of your right foot while keeping your spine upright.


STEP 4

Rest your hands on your knees with palms facing upward.


STEP 5

Touch the thumb and index finger together to form “Gyan Mudra.”


STEP 6

Relax, breathe slowly, and hold the pose for approximately one minute.


STEP 7

Slowly release the pose and repeat using the opposite leg position.

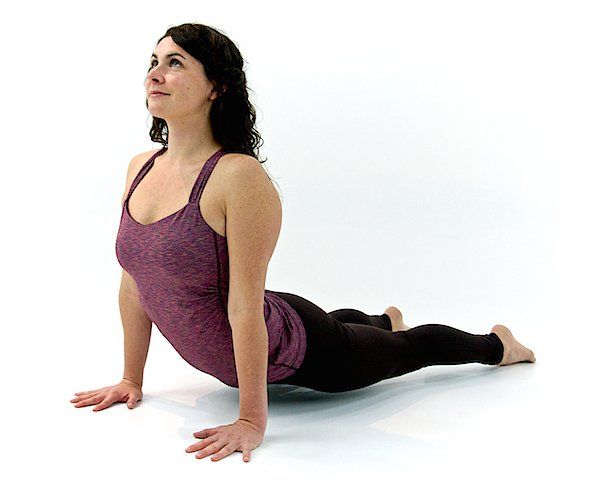
3. Upward Facing Dog

upward facing dog yoga position

Upward Facing Dog strengthens the wrists while improving circulation through the arms, shoulders, chest, and hands.


STEP 1

Lie face down with:

  • legs extended,
  • tops of the feet resting on the mat,
  • and hands positioned beside the lower ribs.

STEP 2

Keep your elbows close to your body and point your fingers forward.


STEP 3

During inhale:

  • press your hands into the floor,
  • straighten your arms,
  • and lift your torso upward.

STEP 4

Keep the thighs firm while gently lifting the chest.


STEP 5

Hold the position for:

  • 15-30 seconds,
  • while breathing slowly and comfortably.

Then slowly lower yourself back to the mat.

4. Bharadvaja’s Twist
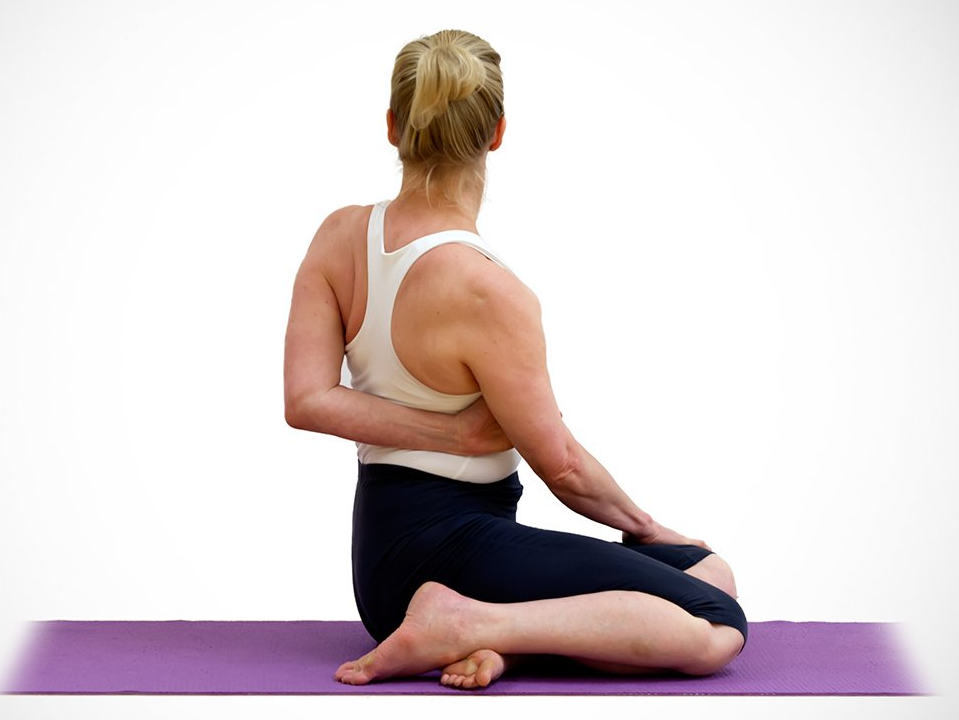
Bharadvaja's twist yoga position

Bharadvaja’s Twist may help improve upper body alignment, spinal mobility, circulation, and muscle balance that indirectly affects the wrists and hands.


STEP 1

Sit on the floor with your legs extended forward.


STEP 2

Shift onto your left hip and bend your knees toward the right side.


STEP 3

During inhale:

  • lengthen your spine.

During exhale:

  • rotate your torso gently to the left.

STEP 4

Place your right fingertips behind you while bringing your left arm behind your back.


STEP 5

Hold the pose while taking slow controlled breaths.


Then slowly unwind and repeat on the opposite side.

5. Prayer Position

yoga prayer stretch

Prayer Position directly stretches the flexor tendons that commonly become restricted in carpal tunnel syndrome.


STEP 1

Press your palms together in front of your chest with fingers pointing upward.


STEP 2

Keep your elbows close to your body.


STEP 3

Slowly raise your elbows while keeping the palms pressed together.


You should feel stretching through:

  • the fingers,
  • wrists,
  • and forearms.

STEP 4

Hold for several seconds and then relax.


Repeat several times while shaking the hands out gently between repetitions.

6. “Stop” Position

yoga stop stretch

The “Stop” Position strongly stretches the flexor tendons from the fingers through the forearm.


STEP 1

Extend your right arm straight outward at eye level.


STEP 2

Raise all fingers upward as if signaling “Stop.”


STEP 3

Use the opposite hand to gently pull the fingers backward.


You should feel stretching through:

  • the palm,
  • wrist,
  • forearm,
  • and fingers.

STEP 4

Hold for approximately:

  • 5 seconds,

then relax and shake out the hand.

Repeat on both sides.

7. Finger Interlace Position

yoga finger interlace stretch

Finger Interlace Position stretches tendons throughout the fingers, wrists, and forearms while improving circulation and flexibility.


STEP 1

Interlace your fingers directly in front of your chest.


STEP 2

Rotate your wrists so your palms face outward.


STEP 3

Extend your arms forward while attempting to keep the elbows straight.


You should feel stretching throughout:

the fingers,

  • wrists,
  • palms,
  • and forearms.

STEP 4

Hold the stretch for:

  • approximately 5 seconds,

then relax and repeat.

8. Thumb Stretch Exercise

yoga thumb stretch

Thumb stretching is especially important because carpal tunnel syndrome commonly affects thumb function and thumb-side hand sensation.


STEP 1

Gently pull the thumb backward until you feel a comfortable stretch.


STEP 2

Hold for:

  • approximately 5 seconds,

then release.


STEP 3

Next, rotate the thumb slowly in circular motions similar to a helicopter blade.


Rotate in both directions several times before switching hands.


Mild popping or clicking sensations may occur during movement and are usually harmless if they are not painful.

🖐 Could Carpal Tunnel Syndrome Be Causing Your Symptoms?
Persistent numbness, tingling, burning, weakness, or nighttime symptoms may signal worsening median nerve compression.

Summary

Carpal tunnel yoga may help reduce numbness, tingling, pain, burning, stiffness, and weakness by improving tendon flexibility, circulation, posture, and upper body alignment.


Many yoga poses help improve tendon gliding and decrease pressure on the median nerve inside the wrist.


For best results:

  • exercises should be performed consistently,
  • movements should remain gentle,
  • and excessive wrist strain should be avoided.


Mild and moderate symptoms often improve most when yoga is combined with:

  • nighttime bracing,
  • stretching,
  • massage therapy,
  • ergonomic changes,
  • and activity modification.

Key Takeaways

  • Carpal tunnel yoga may help reduce pain, numbness, tingling, and stiffness.
  • Yoga helps improve posture, tendon flexibility, circulation, and upper body alignment.
  • Helpful exercises include Cat & Cow, Prayer Position, wrist stretches, and thumb stretches.
  • Exercises should remain gentle and avoid excessive wrist loading.
  • Consistency is extremely important for improvement.
  • Yoga often works best when combined with other conservative treatments.

Sources

About Dr. Zannakis

Biography: Dr. Z - CarpalRx Medical Director & author

Dr. Maik Zannakis (Dr. Z) 

Medical Director at the CarpalRx


Dr. Z is an acclaimed medical scientist renowned for his expertise in carpal tunnel syndrome and soft tissue disorders. With over 40 years of experience, he is credited with hundreds of medical journal publications and hundreds more web articles about carpal tunnel syndrome. After inventing the CarpalRx, Dr. Z became the go-to expert for carpal tunnel syndrome and wrist tendonitis. His opinions, inventions, and personalized care have distinguished Dr. Z as a trusted leader in this growing field. Read full Bio


Click here to learn more about Dr. Z

Email: dr.z@carplarx.com

Phone: 800-450-6118